
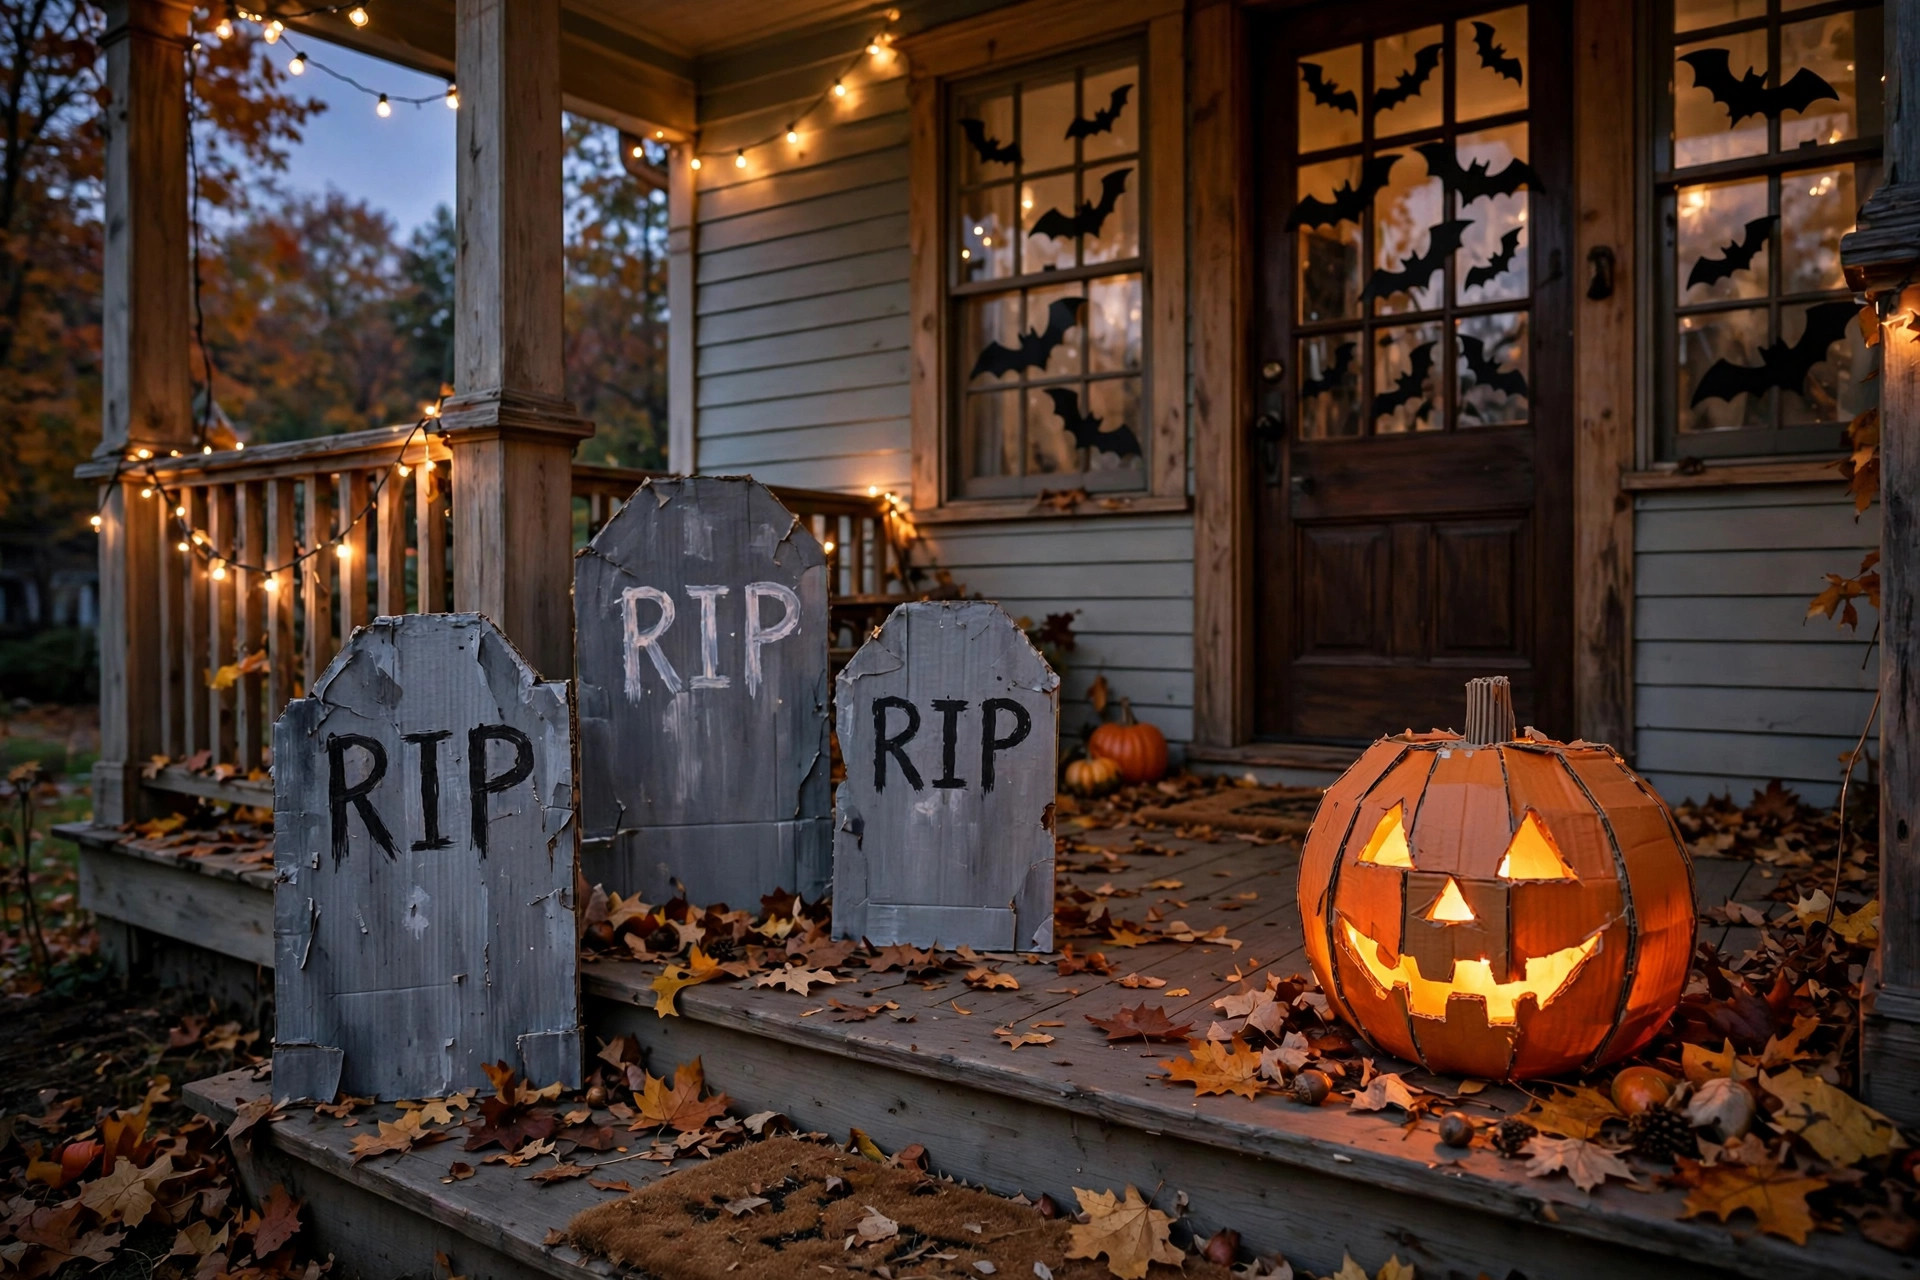
You can build genuinely spooky Halloween decorations from cardboard boxes you already have, for a few dollars each. This guide gives you 12 cardboard Halloween projects with real step-by-step instructions, time and cost estimates, free cutout templates, and the fire-safety rules that keep cardboard decor safe.
What Are the Best Cardboard Halloween Decorations to Make?
Cardboard tombstones, window silhouettes, pumpkin lanterns, bat garlands, and witch cutouts are the best cardboard Halloween decorations for most people: they need only boxes, paint, and LED lights, cost under $5 each, and take 30 to 90 minutes. Use battery-operated lights only, since cardboard is flammable and the NFPA reports candles start about a third of decoration fires.
Why Cardboard Wins for Halloween Decor
Americans are expected to spend a record $13.1 billion on Halloween in 2025, with about $4.2 billion of that going to decorations alone, according to the National Retail Federation’s annual consumer survey. Cardboard flips that math: the main material is free (shipping boxes, cereal boxes, and moving boxes), and most projects below need only paint and lights you may already own. If you want the full breakdown of what DIY actually saves versus buying, see our analysis of how much money DIY decor actually saves.
Cardboard Halloween Safety Rules
Cardboard burns easily, so treat fire safety as step zero. Between 2018 and 2022, decorations started an annual average of 835 home fires, causing 3 deaths, 30 injuries, and $14 million in property damage, according to the National Fire Protection Association (NFPA). Nearly half of those fires happened because decorations sat too close to a heat source, and candles started about 32 percent of them.
Follow these rules for every project below:
- Use battery-operated lights only. The NFPA advises using glow sticks or battery-operated candles in jack-o’-lanterns and other decorations. Never put a real candle inside or near cardboard.
- Keep decorations away from heat. Keep cardboard away from open flames, heaters, and hot light bulbs. The NFPA notes that dried flowers, cornstalks, and crepe paper are highly flammable, so keep those away from your cardboard pieces too.
- Keep exits clear. Do not block doorways or escape routes with decorations.
- Supervise kids around lights. Children should be watched whenever decorative lights are on, and taught to stay away from anything that gets hot.
- Check smoke alarms. Make sure yours work before the season starts.
As NFPA vice president Lorraine Carli puts it: “With a little added awareness and caution, the vast majority of these risks can be prevented.”
What You’ll Need
Most projects use the same short supply list:
- Cardboard: corrugated shipping boxes (sturdy builds), cereal boxes (flat cutouts), kraft sheets (details)
- Box cutter or craft knife, plus a self-healing mat or thick cardboard underneath
- Metal ruler and pencil
- Acrylic craft paint (black, white, orange, grey cover 90 percent of Halloween)
- Foam brushes and one detail brush
- Battery-operated LED tea lights, fairy lights, or puck lights
- Painter’s tape, string or twine, and wooden skewers or dowels for stakes
For assembly, pick the right adhesive: our guide to hot glue vs E6000 vs super glue for DIY decor breaks down which holds cardboard best. If your toolbox is thin, start with our list of basic tools for DIY decor.
Cardboard Basics: Choosing, Cutting, and Painting
Match the cardboard to the project. Corrugated shipping boxes are best for anything freestanding (tombstones, lanterns, haunted houses) because the fluted middle layer adds rigidity. Cereal-box cardboard is ideal for flat window silhouettes and garlands: it cuts cleanly with scissors and takes paint well. Kraft sheets work for small details like lettering.
Cut safely. Always cut away from your body, change blades when they drag, and cut corrugated cardboard with several light passes instead of one hard push. For curves, a craft knife beats scissors.

Fiskars Detail Craft Knife, 8″, with Protective Cover
Best for cutting cardboard shapes, including curves.
Paint for coverage. One coat of cheap acrylic rarely covers printed box graphics. Do a base coat of white or grey primer (or plain white acrylic), let it dry fully, then add your colors. Dry-brushing (barely any paint on a stiff brush, dragged lightly) gives tombstones and wood textures a realistic aged look.

DecoArt Americana Acrylic Paint, 12 Ct Basic Assorted Value Pack
Best for painting cardboard Halloween decorations in black, white, orange and grey.
12 Easy Cardboard Halloween DIY Decorations
1. Classic Cardboard Tombstones
Difficulty: Easy | Time: about 60 minutes for 3 | Cost: under $5
- Draw tombstone shapes (rounded tops, crosses, rectangles) on corrugated cardboard and cut them out.
- For an aged-stone look, peel the top paper layer off patches to expose the corrugated texture underneath.
- Base-coat grey, then dry-brush white highlights and black shading into the texture.
- Paint epitaphs (“RIP,” “Here Lies…”) with black acrylic and a detail brush.
- Tape a wooden skewer to the back of each as a stake for the yard.
2. Spooky Window Silhouettes
Difficulty: Easy | Time: about 45 minutes | Cost: under $3
- Sketch or trace bat, witch, cat, or haunted-house shapes onto cereal-box cardboard. Download our free Halloween silhouette templates (PDF)
- Cut out the shapes and paint them solid black.
- Tape them inside your windows facing out.
- Place a battery-operated LED puck light or string of fairy lights behind each window at night so the silhouettes glow for the street.
3. Cardboard Pumpkin Lantern
Difficulty: Easy | Time: about 60 minutes | Cost: under $5
- Take a square shipping box and cover the outside with orange paper or orange-painted kraft.
- Draw a jack-o’-lantern face on one side and cut it out with a craft knife.
- Cut a hatch in the back panel for access.
- Drop in a battery-operated LED light (never a real candle) and close the hatch.
- Twist brown paper into a stem and glue it on top.
4. Hanging Bat Garland
Difficulty: Easy | Time: about 30 minutes | Cost: under $2
- Fold cereal-box cardboard in half and cut half-bat shapes along the fold so each bat is symmetrical.
- Paint both sides black.
- Punch a small hole at the top of each bat’s wings.
- Thread bats onto black twine at uneven intervals and hang across mantels, doorways, or porches.
5. Ghost Luminaries
Difficulty: Easy | Time: about 40 minutes for 4 | Cost: under $4
- Cut ghost shapes (rounded top, wavy bottom) from white-painted corrugated cardboard, about 12 inches tall.
- Paint simple oval eyes and mouth in black.
- Glue each ghost to a small cardboard base so it stands upright.
- Set a battery tea light behind each one for a soft glow.

AYMXZT 12 Pack Flameless LED Tea Lights Candles, with Timer/Remote
Best for giving ghost luminaries a soft glow.
6. Witch Silhouette for the Yard
Difficulty: Medium | Time: about 90 minutes | Cost: under $8
- Draw a large witch-on-broomstick profile on a flattened appliance-size box (about 3 feet tall).
- Cut it out carefully with a craft knife.
- Paint it solid black and let dry fully.
- Mount it on two wooden stakes with hot glue and cable ties.
- Stake it where porch light hits it so it throws a long shadow.

Surebonder H-195F Specialty Series 20 Watt Mini Size High Temperature Detail Hot Glue Gun
Best for hot-gluing cardboard cutouts to stakes and joins.
7. Mini Cardboard Haunted House
Difficulty: Medium | Time: about 2 hours | Cost: under $6
- Use a medium shipping box as the house body; cut out door and window openings.
- Build a pitched roof from a second piece of cardboard, scored and folded.
- Paint the body dark grey and the roof black; add “shingles” with a silver paint pen.
- Glue printed or drawn curtains behind the windows.
- Place LED fairy lights inside so the windows glow.

innotree 6 Pack LED Fairy String Lights, Battery Operated with Timer, 10Ft 30 LEDs, Warm White
Best for making haunted house windows glow.
8. “BOO” Mummy Letters
Difficulty: Easy | Time: about 30 minutes | Cost: under $3
- Cut large block letters B, O, O from corrugated cardboard.
- Wrap each letter loosely with white crepe-paper streamers or torn white fabric strips, leaving gaps.
- Glue two googly eyes (or painted black ovals) on each O.
- Lean against the mantel or hang with twine.
9. Corner Spider Web
Difficulty: Easy | Time: about 30 minutes | Cost: under $3
- Cut a large quarter-circle of cardboard to fit a wall corner.
- Paint it black or leave it kraft-brown for a rustic look.
- Stretch white yarn across it in radial lines, then weave a spiral, gluing at each crossing.
- Add a cardboard spider (painted black circle body + strip legs) in the web’s center.
10. Coffin Candy Holder
Difficulty: Easy | Time: about 45 minutes | Cost: under $4
- Draw a coffin shape (hexagon: wide shoulders tapering to the feet) on corrugated cardboard, about 18 inches tall. Cut two.
- Cut 3-inch side strips and glue them between the two faces to form the box depth.
- Paint black inside and deep purple or grey outside; add a silver cross or “RIP”.
- Fill with wrapped candy for a trick-or-treat station.
11. Black Cat Cutouts
Difficulty: Easy | Time: about 30 minutes for 3 | Cost: under $2
- Draw arched-back cat silhouettes on cereal-box cardboard. Download our free black cat template (PDF)
- Cut out and paint solid black on both sides.
- Glue each to a skewer stake.
- Place along walkways or peeking from bushes, with a pair of yellow painted eyes for night visibility.
12. Tabletop Mini Graveyard
Difficulty: Easy | Time: about 45 minutes | Cost: under $4
- Cut a 12×18 inch corrugated base and paint it dark brown (dirt).
- Make 4-5 mini tombstones using the method in project 1, sized 3-4 inches tall.
- Add a cardboard dead tree: twisted brown paper strips glued into branches.
- Scatter orange and black painted “leaves” (cut paper ovals) and set a tea light behind the scene.
How to Weatherproof Cardboard Decorations for Outdoors
Unsealed cardboard softens in rain within hours. For yard pieces, seal every surface before displaying:
- Paint first, then seal. Acrylic paint alone is not waterproof.
- Apply two thin coats of outdoor acrylic sealer or water-based polyurethane (such as Mod Podge Outdoor), letting each coat dry fully.
- Pay special attention to cut edges and the corrugated flutes, where water wicks in fastest.
- Elevate pieces off wet ground: stakes, bricks, or a sealed wooden base.
- Bring pieces inside during heavy rain regardless of sealing. Sealed cardboard survives damp nights, not downpours.

Mod Podge Waterbase Sealer, Glue and Finish for Outdoor (8-Ounce), CS11220
Best for sealing outdoor cardboard yard decorations.
Storing Cardboard Decorations for Next Year
Flat pieces (silhouettes, bats, tombstones without stakes) store best: stack them between sheets of parchment paper in a large flat box, in a dry closet or under a bed. For 3D pieces, remove batteries from all lights first (leaking batteries ruin paint), wrap each piece in an old sheet, and store off concrete floors where moisture collects. Label the box by holiday so next October takes minutes, not hours.
Halloween Cardboard Decor FAQs
How long do cardboard Halloween decorations last outside?
Sealed with outdoor acrylic sealer and kept off wet ground, cardboard yard decor lasts the full Halloween season (4-6 weeks). Unsealed cardboard can soften after a single rainy night, so always seal outdoor pieces.
What is the best glue for cardboard Halloween decorations?
Hot glue is fastest for most cardboard joins and holds well for lightweight decor. For pieces that flex or go outdoors, E6000 gives a stronger, weather-resistant bond but needs 24 hours to cure. See our full hot glue vs E6000 vs super glue comparison for details.
Can kids help make cardboard Halloween decorations?
Yes, with supervision. Kids can paint, wrap mummy letters, and thread garlands. Keep box cutters, craft knives, and hot glue guns as adults-only tools, and give kids safety scissors and washable paint instead.
How do you keep cardboard tombstones from falling over?
Tape or glue a wooden skewer, dowel, or paint stirrer to the back as a stake, pushing at least 6 inches into the ground. For windy spots, add a second stake or a small cardboard foot glued perpendicular at the base.
Are cardboard decorations safe with lights?
Yes, if you use battery-operated LED lights only. The NFPA reports candles start about a third of decoration fires, and cardboard ignites easily. Never use real candles in or near cardboard decor.
Make This Halloween Both Spooky and Cheap
Twelve projects, one material you already own, and a total cost well under what a single store-bought yard display runs. Start with the tombstones and window silhouettes this weekend, seal anything going outside, and keep every light battery-powered. For the rest of your decorating toolkit, check our roundup of essential tools for DIY decor.
By Ella Knight. Last updated: October 17, 2026.



